
The "Barn" Build

Hello all.
I have been an avid model builder for 30 plus years, my main subjects have been military aircraft. I like to dabble in other categories, but mainly it's the winged wonders that pique my interest. I am also fascinated with old buildings, especially barns. I also like building dioramas that tell a story. The best builds are when I can do this without adding people. Hopefully, this one will do just that. I also like it when the viewer creates their own story line. Either way, it's fun and it keeps my out of trouble, for the most part. I thought I would share my latest project and hopefully inspire you to build something as well.
The Idea.
When you are building models, working on a train layout, or anything hobby related, one tends to get other ideas. This is the case for the "Barn". I normally build aircraft, mainly WWII. My preferred scale is 1/32nd. It was a few months ago when I had the idea to do a diorama of an old war bird, in pieces, resting in a barn. It was common to find Spitfires and Hurricanes throughout the English countryside, stored up in a barn or shed. But what about an American plane? It so happens that there is a story of a man who would spend over 10 years restoring a P-51 to factory condition, that he found in someone's garage, in the US. That's all I needed to get going.
As with any project, it's a good idea to plan everything out, or at least as much as possible. Simply having a list will help you down the right path. For the Barn build, here's the following items -
Scale: 1/32nd; Structure: Scratch build section of a barn using wood (mahogany and pine for the primary frame); Roof - "Metal-Corrugated" from Evergreen Styrene sheets; Main Kit: Zoukia-Mura P-51D Mustang; Accessories: Miniart Accessory kits (tools, farm tools, etc); Ground effects: Woodland Scenics, Vallejo Pigments; Size: Original plan was for 12" x 18", updated to 17" x 17" (approx.); Assembly materials: Paint, PVA Glue, CA Glue, Weathering Effects (There will be a more detailed list of materials called out during the build).
Step 1: The Planning Begins

I'm using my old drafting skills to draw out the barn. The scale is 3/8" = 1', which is roughly 1/32nd. Drawing out your ideas first will help you plan on what you'll need and how much, and what kind of space your are dealing with. It's always a good idea to do a rough sketch, even for small projects. It helps me visualize things a bit better. It also helps minimize mistakes, especially when you are building something from scratch. The picture below shows a window in the short wall. When I started building the frame, the window had to be omitted in order to place the support beams in the right spot. A minor issue, but one that could have turned out to be a bigger problem later on.

Step 2: The Building Begins
Once you have a good idea on what the structure or layout will be, it will be time to build. I used PVA Glue (AK Interactive Wolverine PVA Glue) for the frame work. CA glue or wood glue could work, but when gluing different materials together, PVA glue works great.
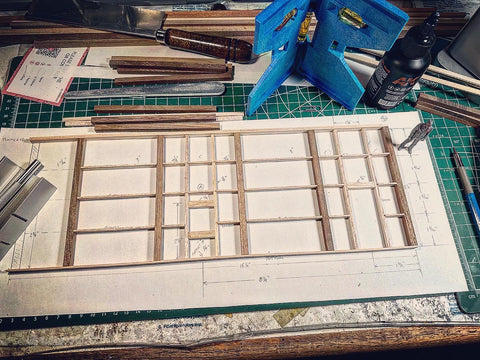
You can use the drawings as a guide, especially if they are to scale. This worked great on laying out the walls and trusses. It was during this time I discovered the issue with the window in the short wall. The walls are a plank design, so I would need to cut strips. I'll go into more detail on this on the next blog.


At one point, my desk looked like a small lumber yard. All part of the process. I used hardwood (as much as I could) for the main structure. This was bought at the hobby store. Balsa wood is great, but in my experience, it can be to soft and when it comes to painting, it absorbs the colors a little to well. The main wood used for the frame and walls was mahogany and pine.

The walls were done without to many issues. The roof trusses however, were a wee bit of a challenge. Any imperfections only added to the character of the barn. After all, it's supposed to an old building.

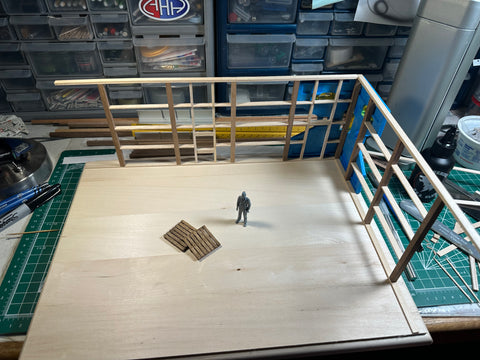
Once the trusses were completed, it was time to start attaching everything to the base.

Time to assembly the frame and attach the trusses. Purlins and girts are added for structural support.
The figure is in 1/32nd. This helps with making sure the sizing is as accurate as possible.


That's all for now. Next up will be the walls and roof.
Till next time.
Steven
Leave a comment